
Maybe you’ve always gardened in soil but now live in the city and don’t have much space to grow like you used to. Or maybe you’ve never grown a thing in your life but stumbled across hydroponics and felt drawn to it because the idea of growing your own food just makes sense.
If you’re new and wondering whether the Kratky method is a good place to start, you’re in the right spot. You’ll learn what the Kratky method is, how it works, what you’ll need to get started, the common bumps along the way, and how other growers have handled them.
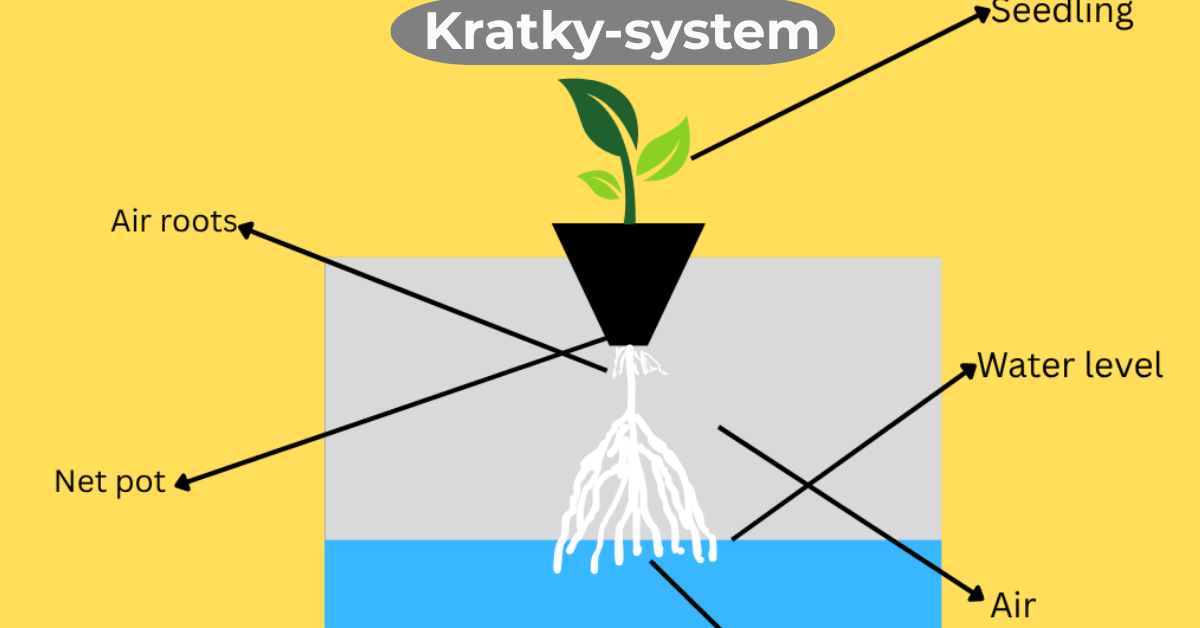
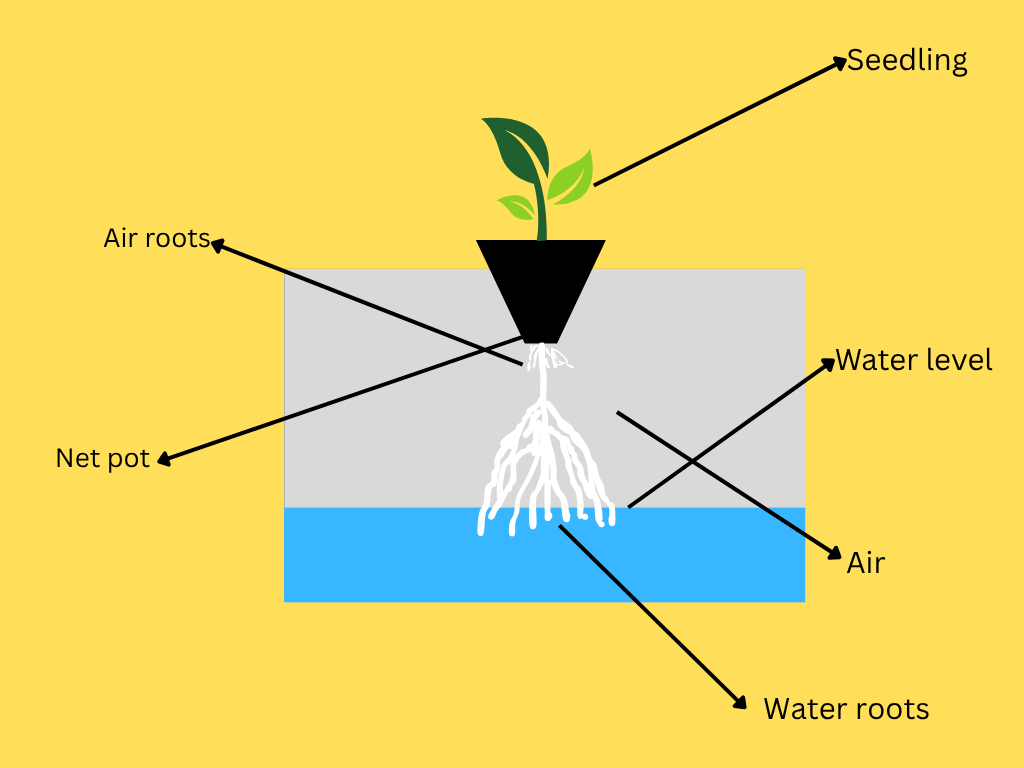
What’s the Kratky Method?
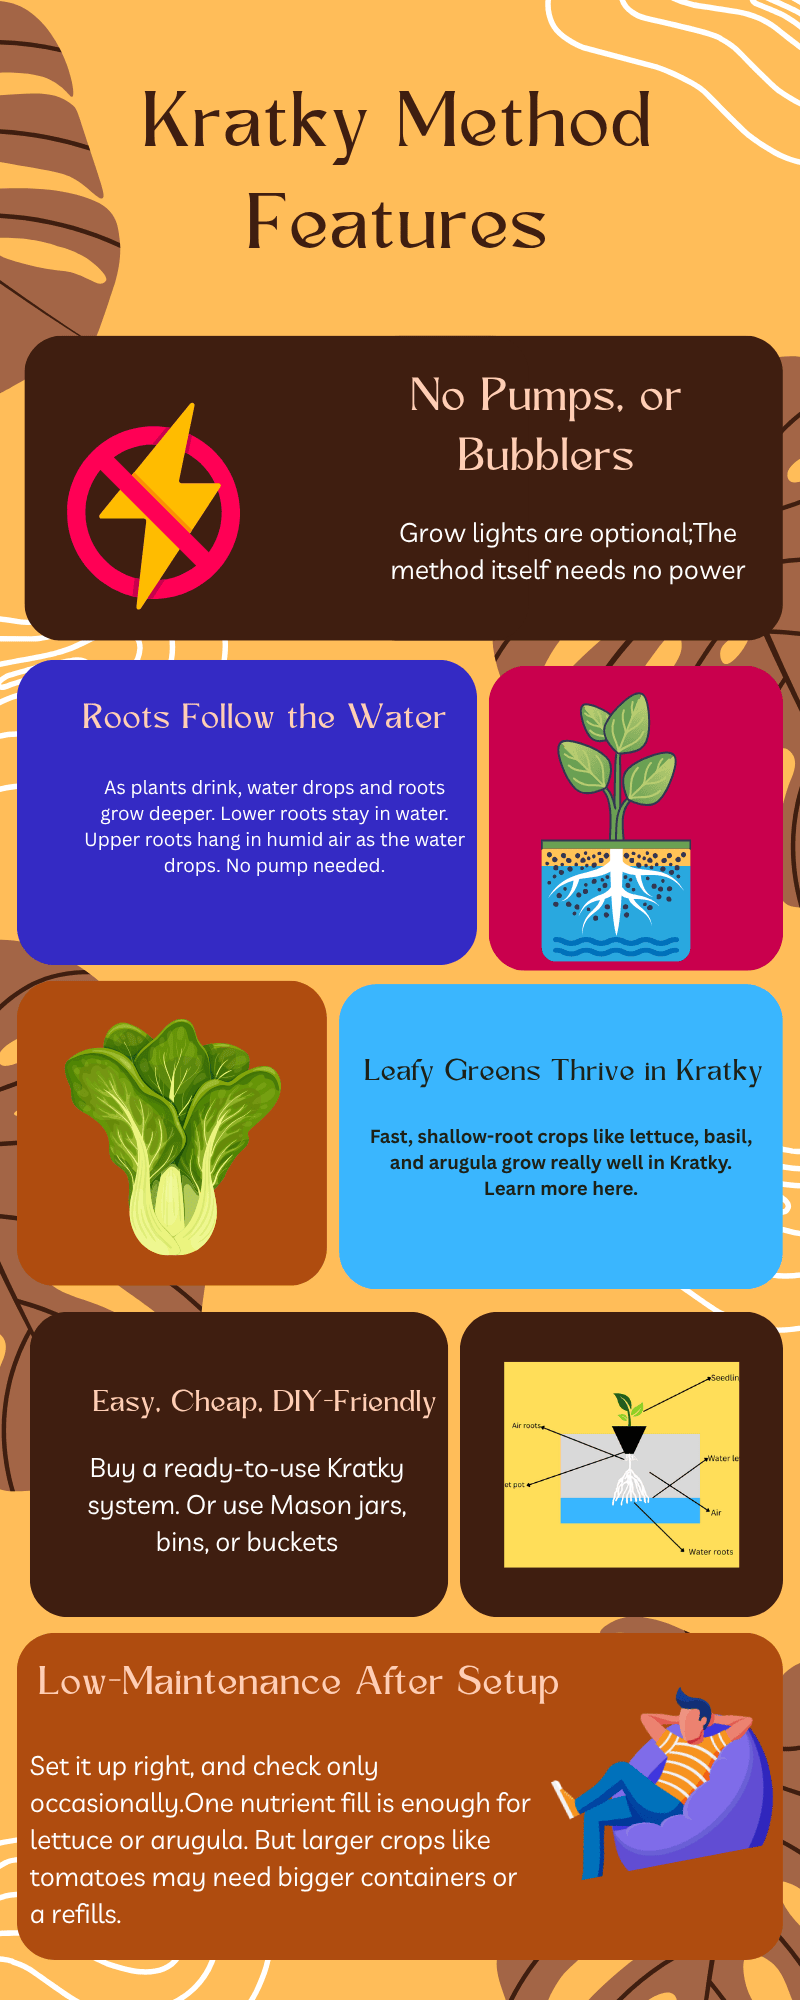
The Kratky Method is a simple, passive hydroponic system where plants grow in a non-circulating container filled with nutrient solution. It uses no pumps, no electricity, and no timers, just water, nutrients, and light. If your growing area isn’t south facing or isn’t accessing light each day, you’ll definitely need grow lights.
As plants grow, part of the roots stay submerged for feeding while the upper roots absorb oxygen from the air. What makes it Kratky isn’t how often you refill the solution, but how the roots access oxygen as water levels drop. It’s a low-maintenance setup that’s perfect for beginners or anyone who wants to grow food without complex equipment.
It’s Not Always a Set-and-Forget Grow System
Some people say Kratky is a set-it-and-forget-it system, but honestly that depends on your setup. If you use a large-enough reservoir, you might make it through the whole growing season without touching the setup.
Smaller containers, like Mason jars, usually need a refill partway through. Both scenarios count as Kratky because the principle is the same: passive hydroponics with a built-in air gap. Fun fact: Dr. B.A. Kratky, the father of the Kratky Method, hasn’t grown anything in a Mason jar.
This method works best for fast-growing plants with moderate root-zone oxygen needs, like leafy greens and herbs. Some of the best vegetables for Kratky are lettuce, arugula, bell peppers, and cherry tomatoes. The method is a lot like soil growing, where roots get air from open space and feed off moisture in the growing media.
Setting Up Your First Kratky System
Most people agree that the Kratky method is the simplest way to grow hydroponically. It’s easy to set up, affordable, and perfect for DIY projects. All you really need is a container, net cups, growing media, liquid nutrients, and a way to check pH.
Container or Tote:
Container size and depth both matter. You’ll need at least 6 to 8 inches of water below the net cups so the roots have enough room to grow and absorb nutrients. About two-thirds of the container should be filled with air, especially at the beginning. Rubbermaid totes work well too, and they come in different sizes, so it’s easy to find one that fits your space.
Wider and shallower containers work better than tall, narrow ones because the roots can spread out and reach what they need more easily.
Plan for one lettuce plant per 5-gallon bucket. In our family, four heads of lettuce per person is usually enough. You can figure out how many plants to grow based on how many people you’re feeding and how often you want fresh greens.
Keeping a steady harvest takes a little planning. In my experience, Kratky-grown lettuce lasts about three months before it starts to bolt. Staggering your plantings makes a big difference. I added a second set of 12 buckets and now start a new crop every two months. By the time the first group begins to bolt, the next one is already growing. That way, we always have lettuce coming in without big gaps.
Net Cups and Growing Media:
Most Kratky growers lean toward using perlite (I belong to the perlite gang), either on its own or mixed with something like coco coir or vermiculite. Straight perlite is popular because it’s cheap, easy to find, and gives roots plenty of airflow without holding too much moisture.
Some gardeners prefer a 50/50 mix with coco coir or vermiculite to strike a better balance between drainage and water retention. I like rockwool for starting seeds, but for regular growing in totes or jars, I stick with perlite or perlite/coco coir.
Net cups are usually black or dark gray, with openings on the sides and bottom so the roots can grow through. They’re filled with growing media to support the young plant as it gets established.
Liquid Nutrients:
It’s best to use nutrients made specifically for hydroponic systems. For lettuce and other leafy greens, a general-purpose formula designed for vegetative growth works well. Look for one that includes essential macro and micronutrients like nitrogen, calcium, magnesium, and iron.
Many home growers have success with options like Masterblend 4-18-38, General Hydroponics Flora Series, or FoxFarm Grow Big Hydroponic. Masterblend is a popular choice for lettuce when used alongside calcium nitrate and magnesium sulfate.
Follow the mixing instructions closely and use clean water. For best results, test your nutrient strength with a TDS or EC meter. Lettuce prefers a lighter mix, so keep it mild to avoid tip burn or bitter leaves. Refresh the solution regularly to keep everything balanced and your plants happy.
pH and EC Meters:
At minimum, get a pH test kit. You don’t have to be a gearhead, but if your water’s too acidic or too alkaline, your plants won’t absorb nutrients properly. An EC meter helps later on, but you can grow decent crops without it if you stick to basic formulas and watch your plants.
How Many Plants Per Kratky Tote?
The number of plants you can grow in a Kratky tote depends on crop type, container size, and plant variety. For leafy greens like lettuce or arugula, you can grow up to 8 plants in an 18-gallon tote. That spacing gives the roots enough room to spread and helps prevent airflow issues above the lid.
Smaller varieties let you fit more into the same space. For example, you can pack 6 micro tomatoes at a time like Orange Hat in a 7-gallon container. But you can’t do the same with a large tomato variety like Cherokee Purple. With this variety, you would only fit one in that same size tote.
A simple rule of thumb I follow when spacing plants in Kratky:
- Stick with one large plant per 5-gallon bucket
- Fit 3 large plants in a 17-gallon tote.
How to Mix Nutrients So You Don’t Kill Your Plants or Waste Money
If you’re using a complete hydroponic formula, there’s no need to add anything extra. A solid two-part system, veg and bloom, can carry your plants from seedling to harvest without supplements.
Here’s one approach that works for me:
- Run veg nutrients for the first two weeks of flowering
- Switch to a 50/50 mix of veg and bloom for the next two
- From week #4 on, use bloom nutrients only
This mirrors the plant’s natural shift from needing nitrogen early to needing more potassium and phosphorus later.
Most crops do well with nutrients mixed at 5ml per liter, which gives around 600 ppm (1.2 EC). That’s a good starting point for Kratky, especially with inert media like rockwool or perlite.
If you’re using something like coco or peat, those tend to hold onto nutrients differently, so keep the mix at 600 ppm and watch how the plants respond over time.
It’s best to use clean, room-temperature water. Add Part A first, stir thoroughly, then add Part B. Never mix concentrates together before diluting because they’ll react and lock up.
If you have a ppm or EC meter, use it. If not, just stay consistent and adjust based on what your plants show you. Curling, browning, or pale leaves usually point to nutrient problems.
Why Your Water Drops So Fast and What to Do About It
Your Kratky reservoir will lose water faster than you’d expect. Some of that is evaporation, but most of it is your plant drinking as it grows, especially in warm or dry conditions.
As the water level drops, the roots grow downward and the air gap increases. That’s normal. But if the water falls too far below the roots or you notice drooping leaves, it’s time to refill.
Topping off with plain water is usually the safest move. It restores the air gap without overfeeding. But if your plant is further along and the leaves are looking pale or stunted, you might need to add a small amount of nutrients with the refill.
Using a bigger container from the beginning slows all of this down. A larger reservoir holds more stable nutrient levels, needs fewer top-offs, and saves money in the long run.
How Much Light Do You Need for Kratky Grows?
Outdoors, 6 to 8 hours of direct sun is enough. Indoors, plants need photons, not just brightness. The key number is DLI (Daily Light Integral). Lettuce needs around 10 to 12 mol/m²/day, tomatoes need 15 or more.
For indoor Kratky, use a full-spectrum LED that delivers around 200 to 400 μmol/m²/s. Keep it on 12 to 16 hours a day, and always give plants at least 6 hours of dark.
Lettuce and herbs don’t need as much light as tomatoes or peppers. Too much can cause leafy greens to bolt and turn bitter.
Mount the light 12 to 18 inches above the canopy. If your plants stretch or look floppy, the light is either too weak or too far away.
If you’re not into calculations, just choose a grow light sized for your container area and use a timer. The plants will show you if you’re in the right range.
What Makes Kratky Lettuce and Other Greens Turn Bitter
I once grew lettuce in basic Kratky jars. The plants looked happy and healthy, but the taste was quite bitter. I still ate it, eyes literally closed.
Meanwhile, my wife and daughter made spinach from the farmer’s market, and both gave me that “Do you really have to grow this stuff?” look.
To be fair, I’d noticed the same bitterness with soil-grown lettuce before, so I knew it wasn’t just the hydro setup. But I will say the Kratky-grown leaves tasted a little more bitter.
What finally helped was a simple tip I came across in a hydroponics forum. After harvesting, I rinsed the leaves and let them sit for about an hour before eating or storing them. That short rest made a big difference. The bitterness faded, and my family could finally enjoy it.
This trick doesn’t work if the plant is already stressed or starting to bolt. But when the lettuce is fresh, that rinse-and-rest step has completely changed how mine tastes.
What You’ll Need to Do Week to Week to Keep Things Moving
Kratky is low-maintenance, but things can still go wrong if you ignore them for too long. Here’s what to check each week:
Keep an eye on the water level: Make sure the lower roots stay in the nutrient solution. If the water has dropped too far, refill with plain water. If the plant is older or the leaves are lightening, use a half-strength nutrient mix instead.
pH: Use a simple pH test kit to keep the solution between 5.5 and 6.0. Outside that range, hydroponic plants can’t absorb nutrients properly, even if they’re available, according to this review article. If pH is too high or too low, adjust using a trusted pH up/down product.
Root health: Pull the net cup gently and look underneath. Roots should be white or cream-colored and feel firm. If they look brown, slimy, or smell bad, clean or replace the system before root rot spreads.
Leaf condition: Pale leaves, crispy edges, or curling usually point to pH or nutrient issues. Small dark spots can be a sign of calcium deficiency. Don’t just top off; check the root zone and pH before adding more nutrients.
Track growth progress: I suggest that you snap a photo or jot a note each week. That makes it easier to spot slowdowns, catch bolting early, or adjust your harvest timing.
What to Do When Your System Smells Funky
A healthy Kratky system should not smell. If you notice a sour, swampy, or rotten odor, something is off in the water or around the roots. The most common cause is anaerobic bacteria, which thrive in warm, low-oxygen water and produce a foul, sulfur-like smell. Other issues include root rot, algae buildup, heat stress, and decaying plant material.
To fix the odor problem, remove the plant and clear out any debris. Rinse the roots well and trim any that are brown, slimy, or mushy. Scrub the container clean and refill it with fresh nutrient solution.
If algae is present, clean it off completely, block light from reaching the water, and use a mild hydrogen peroxide rinse. A teaspoon of 3 percent hydrogen peroxide per gallon of water can inactivate bacteria and temporarily increase oxygen levels.
The CDC says that 3% hydrogen peroxide is a powerful antimicrobial that kills many bacteria and viruses within minutes. Peroxide works by releasing free radicals that attack the DNA and other critical components of microbial cells.
After replanting, maintain a proper air gap, keep water temperatures under 80°F, and avoid overcrowding. To keep odors from coming back, use opaque containers, seal light leaks, and rinse your system between plantings. These simple steps will help keep your Kratky setup clean and odor-free.
What Grows Well in a Kratky System
If you’re just getting started with Kratky, stick with herbs and green leafy vegetables that are compact, fast-growing, and don’t guzzle nutrients. Some of the best performers include lettuce, arugula, basil, and French tarragon. Outside of these, you can also grow bell peppers and tomatoes that stand 12 inches tall or shorter like Red Robin cherry tomatoes. These crops are low-maintenance, grow reliably without pumps or circulation, and can be grown in 5-gallon buckets or totes.
Lettuce is the top choice thanks to its short life cycle and steady leaf production. Arugula grows fast and works great for cut-and-come-again harvests, especially in cool weather. Basil bounces back quickly after trimming, while French tarragon grows steadily from cuttings once established.
Bell peppers and cherry tomatoes take a bit longer but produce well with minimal fuss if you give them enough space and light.
Some vegetables, like full-size tomatoes, zucchini, and broccoli, can be grown in Kratky too but they come with more challenges. They often outgrow containers, need more frequent refills, or don’t give much harvest compared to the effort exerted. Here’s a detailed post on the best veggies to grow in Kratky.
How to Know When It’s Time to Level Up From Basic Kratky
The Kratky method is great for low-maintenance crops like lettuce and herbs. But once you start experimenting with larger or thirstier plants, you might outgrow the simplicity of a static setup.
Yes, some people do grow full-size tomatoes and even cucumbers in Kratky containers, but it takes a lot more effort. And success rates are hit or miss.
4 Signs It Might Be Time to Upgrade
- Plants look stressed even with good nutrients and water: This usually means the plants aren’t getting enough oxygen through the air gap. As root systems grow larger or room temperatures rise, you’re likely to experience this situation
- You’re topping off water constantly: If your reservoir drains too fast, that’s because the system isn’t keeping up with your plant’s needs.
- Nutrient strength drops quickly: Rapid growth can cause your solution to weaken faster than expected, leading to nutrient deficiencies.
- Plants stall or grow slowly despite everything looking “right.” This is often a sign the system isn’t delivering enough oxygen or hydration to keep up with demand.
Before switching to a different growing method, consider adding a wick to help keep the roots consistently moist. If that doesn’t improve resolve the issue, drop in a small air stone to give the roots more oxygen. Another trick is to move the plant to a bigger container with more nutrient solution. And if none of those fixes work, it’s time to upgrade to an active system like DWC.
What Hydroponics Gardeners Say About Kratky
Most gardeners who try Kratky like how easy it is to get started. You don’t need electricity, pumps, or timers if you’ll be relying on natural sunlight. That makes it especially appealing for beginners, off-grid locations, or anyone wanting a low-maintenance or minimalist way to grow leafy greens and herbs.
That said, the Kratky method does have its limits. Many growers run into problems when they try to grow larger plants or more demanding ones.
Nutrient issues, poor lighting, or underestimating water use are common frustrations. Some also learn the hard way that Kratky isn’t truly “set and forget” unless you size your system right.
Even so, plenty of people stick with it because it’s simple and, for the right crops, fairly predictable.Others move on to active systems like DWC or ebb and flow to speed up growth, increase yields, or grow a wider range of plants. Think of Kratky as a low-commitment way to get started with soilless gardening.
So, stop waiting. Give it a shot and see how it goes for you. You’ll never know until you get in, and there’s no better time than this time.
FAQs
Can you grow tomatoes in Kratky?
Yes, you can grow tomatoes using the Kratky Method, especially smaller or microdwarf tomato varieties like Red Robin cherry, Orange Hat, Yellow Canary, Hardin’s Miniature, andTiny Tim. These suited to passive systems because they require less water and support than full-sized tomatoes. While it’s possible to grow larger tomato varieties, it takes extra planning. Think of larger containers, more frequent nutrient top-ups, and added support for the weight of the plant.
Does the Kratky system need grow lights?
If you have a south-facing window or an area that gets 6–8 hours of strong natural light each day, you may not need grow lights. But most indoor setups benefit from extra light. The best grow lights for Kratky are full-spectrum LED lights, especially those around 6500K, which support both leafy and fruiting growth.
What are the best plants to grow in Kratky?
Lettuce is the easiest and most beginner-friendly plant to grow in a Kratky system. It grows fast, doesn’t need support, and thrives in passive hydroponics systems like Kratky. You can usually start harvesting baby lettuce in 2–3 weeks, with full heads ready in 30–45 days. Other top plants include bok choy, green onions, peas stems, arugula, and bell peppers.
Can I use jars for the Kratky Method?
Yes, you can absolutely use jars for the Kratky Method. This gardening idea is often called mason jar hydroponics and is perfect for small leafy greens and herbs like lettuce, basil, mint, and green onions. Wrap the jar in foil or use amber glass to block light so algae won’t grow in the nutrient solution. You’ll also need a net pot or lid that supports the plant above the water.

Patrick M. holds a degree in horticulture and has over 10 years of experience as a senior production manager at Syngenta. He also completed advanced training in plant breeding at Texas A\&M. His work in Kenya, Norway, Sweden, and Denmark brings a wealth of practical insight to his writing on IndoorGrowLife.com. Patrick is passionate about helping people grow fresh food indoors using hydroponic systems.